Securely connect to your home
Nowadays we all have many connected devices at home for a plethora of reasons: SmartHome, AdBlocker, DNS, Storage. Furthermore we maybe want to connect to our home environment on the road to use home backup or geo-blocked services.
And maybe we also have systems somewhere else, where we want to connect securely. Like the cloud…
What is a virtual private network(VPN)
A virtual private network let’s you access remote resources, as if you would be connected to the same network. Hence the name virtual private network (VPN)
There are many protocols and provider out there. Some of the more noteworthy:
Connecting to a VPN is mainly used to connect to private networks of your own, so you don’t have to directly connect to the services over the internet directly.
Another main use case is to reach the internet in a privacy minded fashion. If you connect to a VPN and then open a website, the Website will only see the IP of the VPN provider and your ISP will only see the connection to the VPN provider.
Why Wireguard
I won’t cover here in detail the concepts and inner workings of wireguard. The author himself explains it on his own homepage really well: https://www.wireguard.com/#conceptual-overview
Some of the noteworthy advantages:
- Direct kernel integration (from 5.6 onward)
- Modern cryptography
- Easy to use
- Available for Windows, macOS, BSD, iOS and Android
It’s important to note, that Wireguard is mainly a VPN protocol, and not a full blown VPN service. Just as OpenVPN is a protocol and the OpenVPN Access Server is a service. However, you can use the base functionality of Wireguard quite easy. But that only applies to the server, there are already nice clients available for all platforms for a ease of use. You’ll see that in the configuration section later.
However enterprise integrations are not yet created. For instance, you can’t properly manage users, network access control, public keys etc for a Wireguard server instance. But those will probably come pretty soon. Would be nice to see Wireguard in Windows integrated as well…
Is Wireguard secure
Wireguard is now considered pretty secure, although it just recently reached version 1.0 and completed an independent penetration test: https://arstechnica.com/gadgets/2020/03/wireguard-vpn-makes-it-to-1-0-0-and-into-the-next-linux-kernel/
However, if you use Wireguard as a service from a provider, keep in mind, that your ip in the VPN is locked to your public key and your latest connected public IP is also stored in the log.
These aspects are not very relevant in your own small private environment, but they would matter greatly when you use Wireguard as an interface to a VPN service provider.
Wireguard Installation
Installation is pretty straightforward. Either you have already a kernel 5.6, then you basically don’t need to do anything.
If you have a more or less modern environment, it might very well be, that wireguard is in the backports section of the distribution (like Debian and thus Raspbian).
There is a nice installation guide for Debian/Raspbian:
- https://engineerworkshop.com/2020/02/20/how-to-set-up-wireguard-on-a-raspberry-pi/
- https://engineerworkshop.com/2020/04/22/how-to-set-up-a-wireguard-vpn-server-on-ubuntu-linux/
- The current Debian Buster 10 does not have the wireguard packages yet, but the package is already included in the backports repository:
echo "deb http://deb.debian.org/debian buster-backports main" | sudo tee --append /etc/apt/sources.list
- Next, install the Debian distro keys:
sudo apt-key adv --keyserver keyserver.ubuntu.com --recv-keys 04EE7237B7D453EC
sudo apt-key adv --keyserver keyserver.ubuntu.com --recv-keys 648ACFD622F3D138
- Update your package list:
sudo apt update
- Install WireGuard:
sudo apt -t buster-backports install wireguard
Configuration Client
In our example we install the mobile app. Just go to the app store of your choice and install the app. Find the direct links also on the wireguard homepage: https://www.wireguard.com/install/
When you start the app, just create a new manual config:
- Name -> Your Client Name
- Private Key -> Press the reload button on the right
- Public Key -> copy the public key, after you have created the private one
- Address -> Choose an address in the same block as your server. In our example: 10.0.0.10/32
- DNS -> Your DNS server in your local net, or a good one in the internet: 1.1.1.1 or 9.9.9.9
- Press the save icon on the top right
Now you can transport the client key to the server.
Configuration Server
First we need to create our public/private pairs for our server. You should create the client key pair on the client. Most apps actually do support that and you can write down the public key actually anywhere.
sudo su
cd /etc/wireguard
umask 077
wg genkey | tee server_private_key | wg pubkey > server_public_key
You can see the generated keys with:
cat server_private_key
cat server_public_key
Next we create the WireGuard Server configuration with:
nano wg0.conf
And add the following:
(change the server private and client public keys, and adapt the network and port if you want)
[Interface]
Address = 10.0.0.1/24
SaveConfig = true
PrivateKey = <insert server_private_key>
ListenPort = 51900

PostUp = iptables -A FORWARD -i %i -j ACCEPT; iptables -A FORWARD -o %i -j ACCEPT; iptables -t nat -A POSTROUTING -o eth0 -j MASQUERADE
PostDown = iptables -D FORWARD -i %i -j ACCEPT; iptables -D FORWARD -o %i -j ACCEPT; iptables -t nat -D POSTROUTING -o eth0 -j MASQUERADE

[Peer]
PublicKey = <insert client_public_key>
AllowedIPs = 10.0.0.10/32
Edit sysctl.conf on the Raspberry Pi and uncomment the line with “net.ipv4.ip_forward=1” and save.
nano /etc/sysctl.conf
Reboot your RPi for all of your changes to take effect.
Operations
Set up WireGuard to start automatically on reboot:
systemctl enable wg-quick@wg0
chown -R root:root /etc/wireguard/
chmod -R og-rwx /etc/wireguard/*
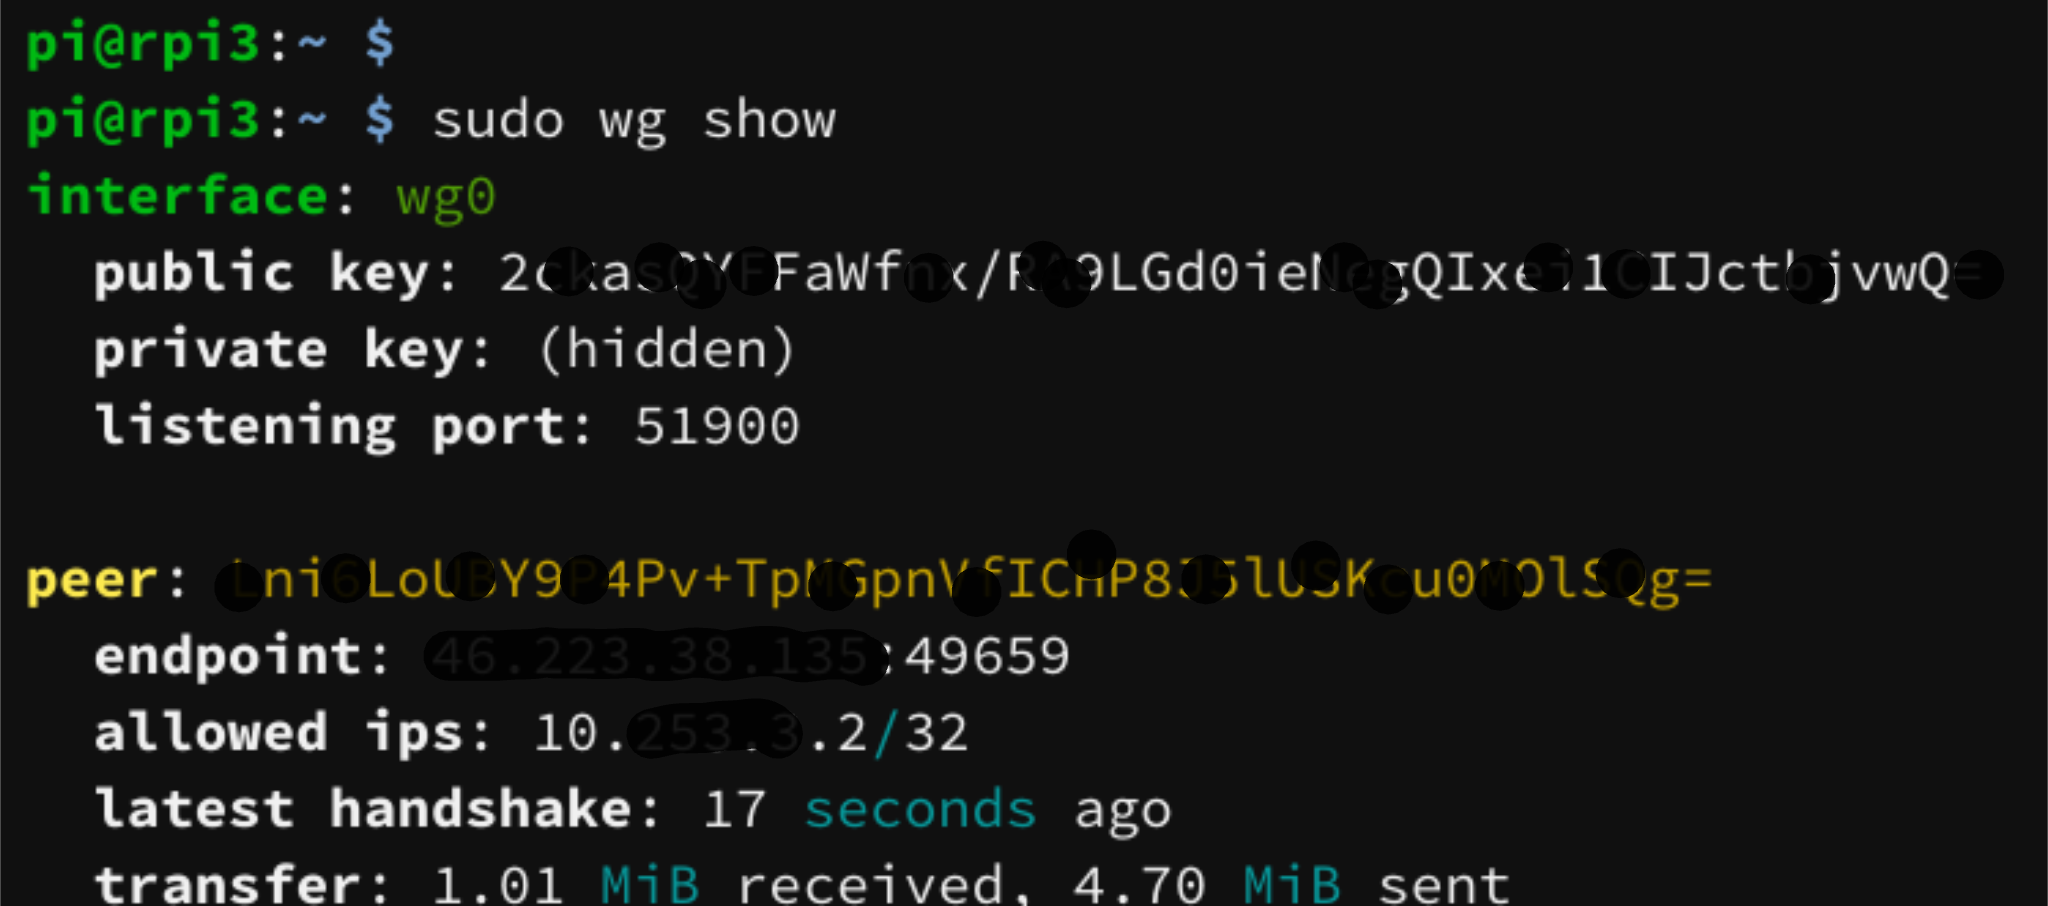
You can check the status via:
sudo wg show
Thanks for reading and feedback is welcome!